Command line environment
Run several processes at the same time while keeping track of them, how to stop or pause a specific process and how to make a process run in the background. We will also learn about different ways to improve your shell and other tools, by defining aliases and configuring them using dotfiles. Both of these can help you save time, e.g. by using the same configurations in all your machines without having to type long commands. We will also look at how to work with remore machines using SSH.
Job control
In some cases you will need to interrupt a job while it is executing, for instance if a command is taking too long to complete(such as a find with a very large directory structure to search through). Most of the time, you can do Ctrl-C and the command will stop. But how does this actually work and why does it sometimes fail to stop the process?
Killing a process
Your shell is using a Unix communication mechanism called a signal to communicate information to the process. When a process receives a signal it stops its execution, deals with the signal and potentially changes the flow of execution based on the information that the signal delivered. For this reason, signals are software interrupts.
In our case, when typing Ctrl-c this prompts the shell to deliver a SIGINT signal to the process. Ctrl-\ represents SIGQUIT. While SIGINT and SIGQUIT are both usually associated with terminal related request, a more generic signal for asking a process to exit gracefully is the SIGTERM signal. To send this signal we can use kill command, with the synax kill -TERM <PID>. below are some signal
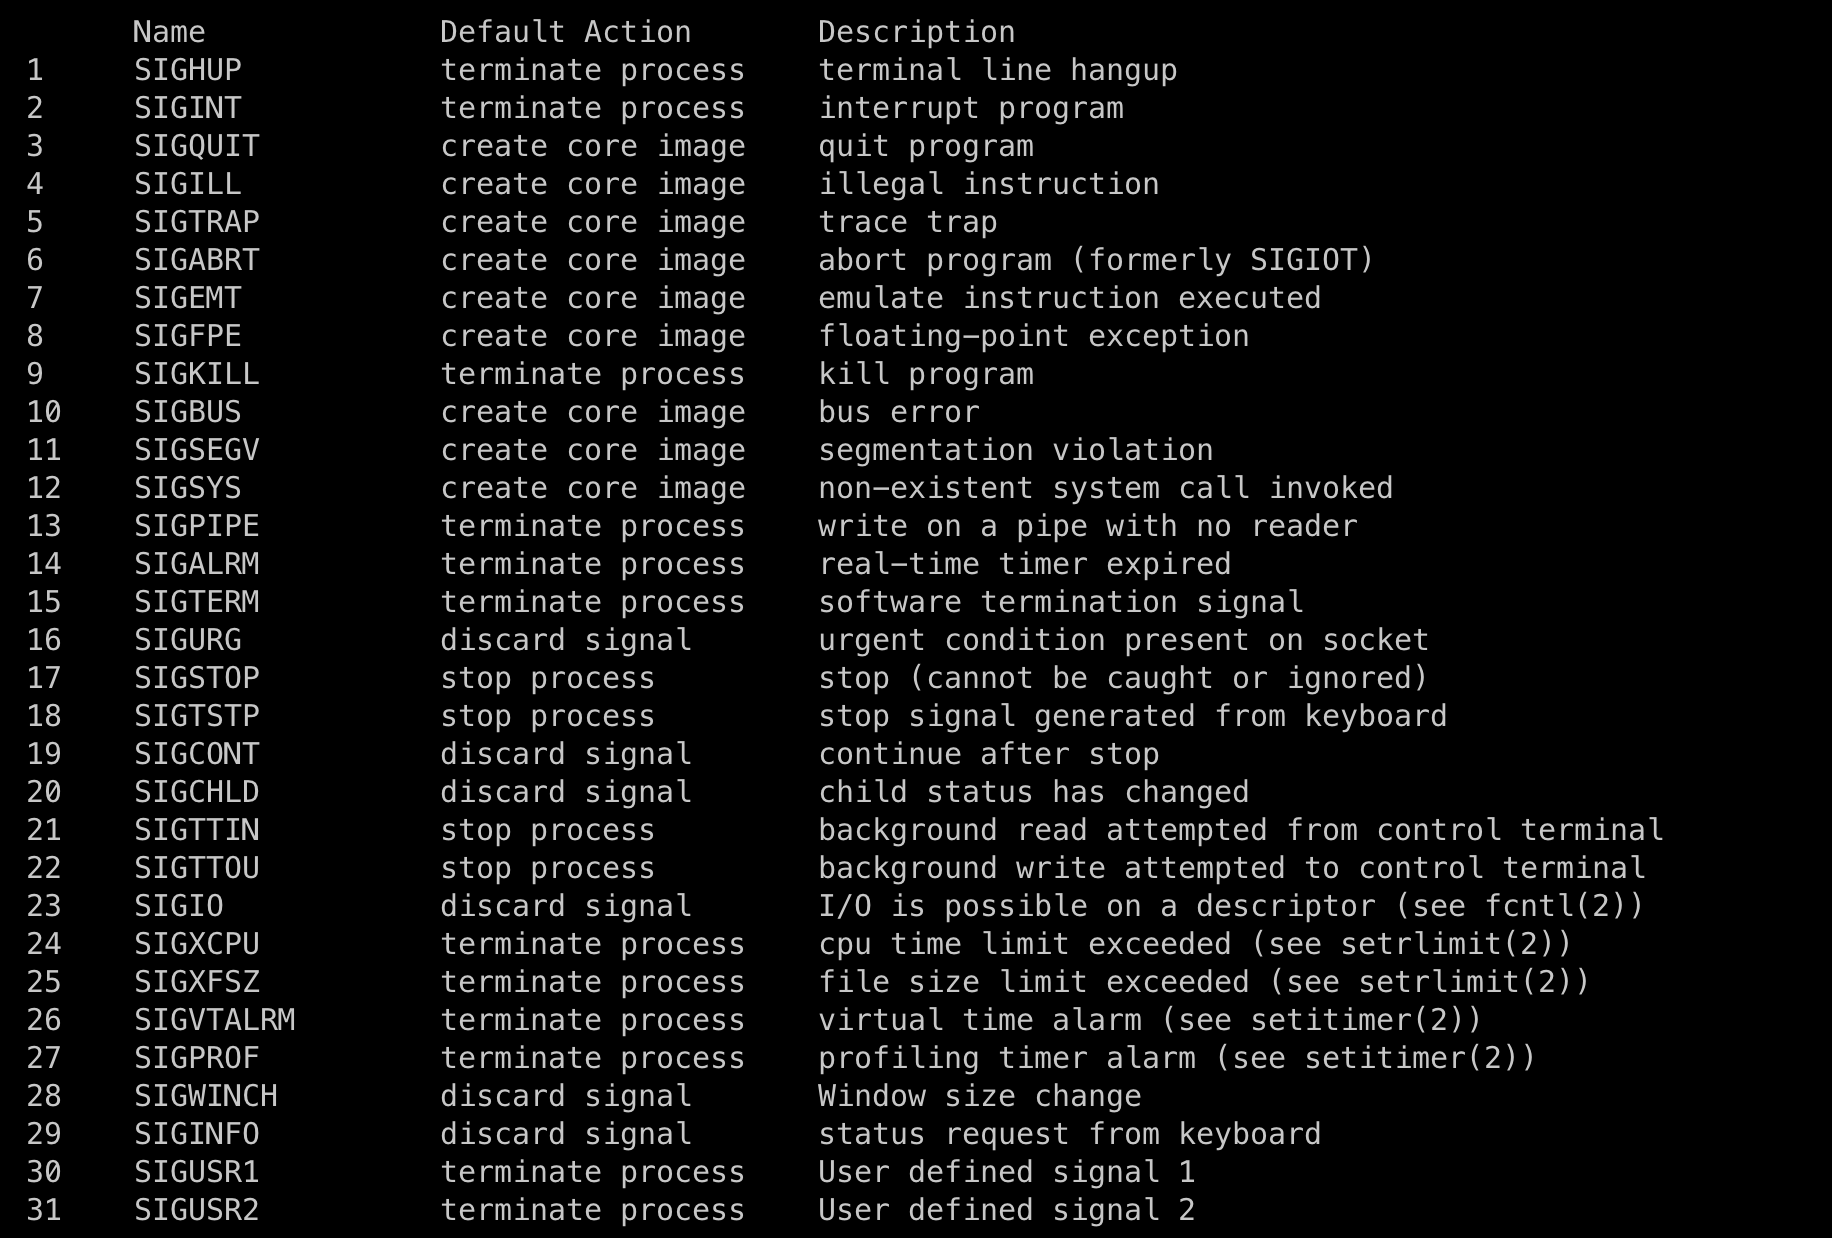
Pausing and backgrounding process
Signals can do other things beyond killing a process. For instance, SIGSTOP pauses a process. In the terminal, typing Ctrl-z will prompt the shell to send a SIGTSTP signal, short for Terminal Stop(i.e. the terminal's version of SIGSTOP).
we can then continue the paused job in the foreground or in the background using fg or bg, respectively.
The jobs command lists the unfinished jobs associated with the current terminal session. You can refer to those jobs using their pid (you can use pgrep to find that out). More intuitively, you can also refer to a process using the percent symbol followed by its job number (displayed by jobs). To refer to the last backgrounded job you can use the $! special parameter.
One more thing to know is that the & suffix in a command will run the command in the background, giving you the prompt back, although it will still use the shell’s STDOUT which can be annoying (use shell redirections in that case).
To background an already running program you can do Ctrl-Z followed by bg. Note that backgrounded processes are still children processes of your terminal and will die if you close the terminal (this will send yet another signal, SIGHUP). To prevent that from happening you can run the program with nohup (a wrapper to ignore SIGHUP), or use disown if the process has already been started. Alternatively, you can use a terminal multiplexer as we will see in the next section.
A special signal is SIGKILL since it cannot be captured by the process and it will always terminate it immediately. However, it can have bad side effects such as leaving orphaned children processes.
You can learn more about these and other signals here or typing man signal or kill -l.
Terminal Multiplexers
tmux expects you to know its keybindings, and they all have the form <C-b> x where that means (1) press Ctrl+b, (2) release Ctrl+b, and then (3) press x. tmux has the following hierarchy of objects:
- Sessions a session is an independent workspace with one or more windows
tmuxstarts a new session.tmux new -s NAMEstarts it with that name.tmux rename-session -t 0 databaserename your existing session. the default name of session is number.tmux lslists the current sessions- Within
tmuxtyping<C-b> ddetaches the current session tmux aattaches the last session. You can use-tflag to specify which
-
Windows Equivalent to tabs in editors or browsers, they are visually separate parts of the same session
<C-b> cCreates a new window. To close it you can just terminate the shells doing<C-d><C-b> NGo to the N th window. Note they are numbered<C-b> pGoes to the previous window<C-b> nGoes to the next window<C-b>, Rename the current window<C-b> wList current windows
-
Panes Like vim splits, panes let you have multiple shells in the same visual display.
<C-b> "Split the current pane horizontally<C-b> %Split the current pane vertically<C-b> <direction>Move to the pane in the specified direction. Direction here means arrow keys.<C-b> zToggle zoom for the current pane<C-b> [Start scrollback. You can then press<space>to start a selection and<enter>to copy that selection.<C-b> <space>Cycle through pane arrangements.
Here is a quick tutorial on tmux
Dotfiles
Many programs are configured using plain-text files known as dotfiles(because the file names begin with a ., e.g. ~/.vimrc, so that they are hidden in the directory listing ls by default).
shell are one example of programs configured with such files. On startup, your shell will read many files to load its configurarion. Depending on the shell, whether you are starting a login and/or interactive the entire process can be quite complex.
For bash, editing your .bashrc or .bash_profile will work in most systems. Here you can include commands that you want to run on startup, like the alias we just described or modifications to your PATH environment variable. In fact, many programs will ask you to include a line like export PATH="$PATH:/path/to/program/bin" in your shell configuration file so their binaries can be found.
Some other examples of tools that can be configured through dotfiles are:
bash-~/.bashrc,~/.bash_profilegit-~/.gitconfigvim-~/.vimrcand the~/.vimfolderssh-~/.ssh/configtmux-~/.tmux.conf
How should you organize your dotfiles? They should be in their own folder, under version control, and symlinked into place using a script. This has the benefits of:
Easy installation: if you log in to a new machine, applying your customizations will only take a minute.Portability: your tools will work the same way everywhere.Synchronization: you can update your dotfiles anywhere and keep them all in sync.Change tracking: you’re probably going to be maintaining your dotfiles for your entire programming career, and version history is nice to have for long-lived projects.
you can find tons of dotfiles repositories on Github — see the most popular one here (we advise you not to blindly copy configurations though). Here is another good resource on the topic.
All of the class instructors have their dotfiles publicly accessible on GitHub:Anish.
here are some knowledge from exercise.
tmux custmization following these steps
How to create symbolic link
create a version control folder for dotfiles
dotfiles hw
Set up a method to install your dotfiles quickly(and without manual effort) on a new machine. This can be as simple as a shell script that calls ln -s for each file. After this you can
- Test your installation script on a fresh virtual machine.
- Migrate all of your current tool configurations to your dotfiles repository.
- Publish your dotfiles on GitHub.
#!/bin/bash
files=$(ls -a ~gits/dotfiles | grep -E '\..*' | grep -v .git)
for file in 'echo $files'; do
    ln -s ~/gits/dotfiles/$file ~/$file   #create softlink
done
Remote machines
Install a Linux virtual machine
1. Go to ~/.ssh/ and check if you have a pair of SSH keys there. If not, generate them with
id_ed25519 and id_ed25519.pub to store prive key and public key respectively.2. Edit .ssh/config to have an entry as follows
Host ubuntu-server2204
    User andy
    HostName 192.168.159.216
    Identityfile ~/.ssh/id_ed25519
    LocalForward 9999 localhost:8888
ssh-copy-id ubuntu-server2204 to copy your ssh key to the server.4. Start a webserver in your VM by executing
python -m http.server 888. Access the VM webserver by navigating to http:localhost:9999 in your machine.5. Edit your SSH server config by doing
sudo vim /etc/ssh/sshd_config and disable password authentication by editing the value of PasswordAuthentication. Disable root login by editing the value of PermitRootLogin. Restart the ssh service with sudo service sshd restart. Try sshing in again.
Here is the operation on Virtual Machine
- 在虚拟机上创建root登录账号(login as root)。caution: it is different between login as root and root user.
ps: sshd service may need restart VM to take effect, start the VM in terminal:VBoxManage startvm "Ubuntu-Server-22.04" --type headless ssh ubuntu-server2204 passwd root #输入密码,创建root登录账号 sudo vim /etc/ssh/sshd_config # find the line #PermitRootLogin prohibit-password, create a new line below # add "PermitRootLogin yes" service sshd restart # restart sshd service and bring the change into effect exit
-
Login as root and connect to VM
ssh root@192.168..login as root successfully. -
reconfig sshd, forbid login as root
-
login as root again
the change forPermitRootLoginandPasswordAuthenticationwill only affect login as root, but won't affectssh ubuntu-server2204
the permission for login as root has risk for security, so it is not advisable. for the created login as root method, can be deleted as follows: